One of the thing you want to do often, when making a game, is animate an object.
We are going to learn how to move a red square image across the pygame window. Here’s an animation of the finished product:
The full code is at the below. Download Source Code
Scroll down for a line by line of the important parts
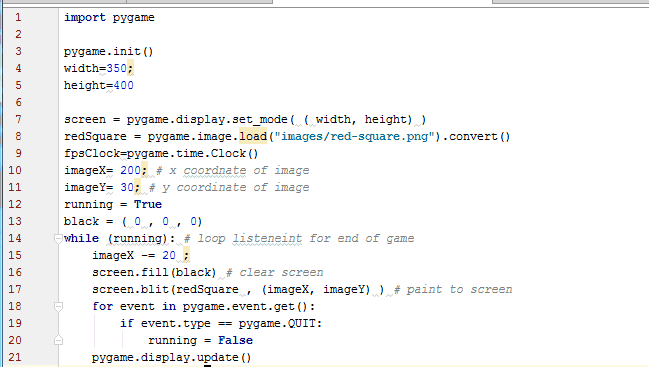
import pygame

pygame.init()
width=350;
height=400

screen = pygame.display.set_mode( ( width, height) )
redSquare = pygame.image.load("images/red-square.png").convert()
fpsClock = pygame.time.Clock()
imageX= 200; # x coordnate of image
imageY= 30; # y coordinate of image
running = True
black = ( 0 , 0 , 0)
while (running): # main game loop
    imageX -= 20 ;
    screen.fill(black) # clear screen
    screen.blit(redSquare , (imageX, imageY) ) # paint to screen
    for event in pygame.event.get():
        if event.type == pygame.QUIT:
            running = False
        if event.type == pygame.MOUSEBUTTONDOWN:
            # Set the x, y postions of the mouse click
            x, y = event.pos
    pygame.display.update()
    fpsClock.tick(30)
#loop over, quite pygame
pygame.quit()
Let’s look at some important lines
Line 8 :
redSquare = pygame.image.load(“images/red-square.png”).convert()
This line loads an image (read more here)
Line 9 : fpsClock = pygame.time.Clock()
This line grabs a reference to Pygame’s clock which we’ll store in a variable called fpsClock (which we’ll use to control the animation framework — see line 25)
Lines 15-17
imageX -= 20 ;
screen.fill(black)
screen.blit(redSquare , (imageX, imageY) )
These lines are where all the action is .
Line 15 : updates the x coordinate (well, the variable that we’ll use for the x coordinate of the image
Line 16 : clear surface so that it’s blank
Line 17 : blit the image to the screen at the new x (imageX)
Want to see what this program would look like without line 16 (clearing canvas)?
Here you go :
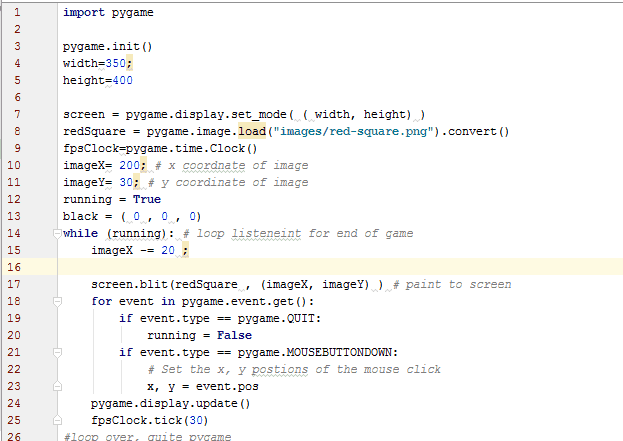
Without line 16, we keep painting or blitting the red square onto the surface so , as you can see, instead of our intended goal of having the square more left, what happens is that we pain the square left and then when paint the square again to the left so the image just appears to expand leftwards.
LIne 25 : controls the effective frame rate
fpsClock.tick(30)
Let’s see what would happen if we changed the 30 to a 3 so that the line now becomes
fpsClock.tick(3)
Here’s the animation (Recorded at the same speed btw)
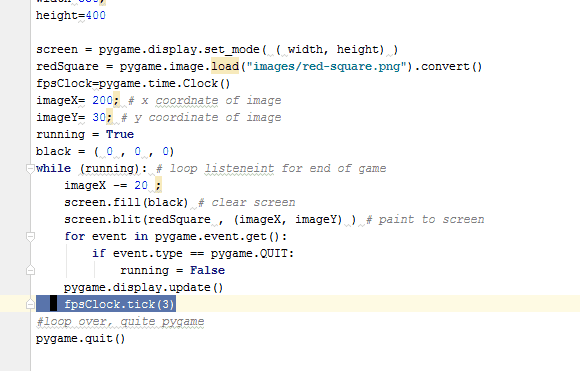
As you can see the frame rate has drastically decreased